Installing network printers from SharePoint
This is a cross-post from the good folk over at EndUserSharePoint.com
A good while ago, there was a lot of discussion on the Microsoft Technet forums about how to use SharePoint to allow end users to install network based printers. A few ideas were batted back and forth and ultimately, it came down to uploading a bunch of links that pointed to each printer object on the closest server (i.e. \\servername\printername).
This worked fine and you could even add some custom columns to group them by office, floor number etc but it lacked some “finesse”. I thought I’d go about making this into a much more user friendly and graphical experience and came up with a pretty simple way to display a floor plan of the office which the user could then use to locate their closest printer and install it with a click. This is especially useful where staff members are visiting from other offices (and hence do not know the layout of the office and printer names).
So how is this achieved? It’s actually pretty simple but can take some time to set up. So let’s get cracking.
You will need:
- Visio to create your floor plans.
- Visio viewer installed on all client machines.
- A small vbs script for each printer. Note: you will need to ensure vbs files are allowed in your environment.
- A document library to store the scripts and Visio diagram(s).
Scripts:
Let’s start by setting up the scripts. Create a new txt file on your desktop and open it up. Copy and Paste in the following snippet of code (remembering to change the path to the printer):
‘ Printers.vbs – Windows Logon Script.
Set objNetwork = CreateObject(“WScript.Network”)
objNetwork.AddWindowsPrinterConnection \\SERVERNAME\PRINTERNAME
Save this file as YOURPRINTERNAME.vbs. Rinse and repeat for each printer. Once they have been created, upload them all to your document library. See, I told you it was easy!
Now we need to link these files to our floor plan. But wait, we don’t have a floor plan yet!
Floor Plan:
To create your floor plan, fire up Visio and design it accordingly. This part may take some time to get right, depending on how accurate you want to be and how experienced you are with Visio.
Hint: Your facilities department may already have access to existing Visio floor plans so check that route out first.
Once done, we now need to add some printer shapes to the appropriate places on your floor plan. I’ve filled in my printer symbols with a blue colour so they stand out a bit from the other shapes (mainly because I couldn’t find any quality printer shapes to download and the stock ones are a bit ugly).
Now you need to turn those printer shapes into hyperlinks. Do this by right-clicking the printer symbol and select Hyperlink from the menu.

Type in the URL to the relevant script in your document library, give it a useful description and click OK. Repeat this for each printer shape on your diagram. When you are happy, save the file and upload this into the same document library we created earlier.
Note that if you have multiple floors in your building, you can add each floor plan into its own page within your Visio file (remember to rename the pages as Floor 1, Floor 2 etc).
We’re nearly done so stay with me. All that’s left is to display your floor plan in SharePoint and we’re good to go.
Configure SharePoint:
Browse to the SharePoint page where you want to display the floor plan and click on Site Actions | Edit Page.
Add our good friend, then content editor web part (CEWP) to this page.
Open the source editor of the web part and paste in the following code (changing the path to the Visio file accordingly):
 <OBJECT classid="CLSID:279D6C9A-652E-4833-BEFC-312CA8887857"
codebase="http://www.microsoft.com/downloads/info.aspx?na=90&p=&SrcDisplayLang=en&SrcCategoryId=&SrcFamilyId=d88e4542-b174-4198-ae31-6884e9edd524&u=http%3a%2f%2fdownload.microsoft.com%2fdownload%2f6%2ff%2f5%2f6f569198-e7d0-49af-b162-54a11f38d301%2fvisioviewer.exe"
id="viewer1" width="100%" height="500">
<param name="BackColor" value="16777120">
<param name="AlertsEnabled" value="1">
<param name="ContextMenuEnabled" value="1">
<param name="GridVisible" value="0">
<param name="HighQualityRender" value="1">
<param name="PageColor" value="16777215">
<param name="PageVisible" value="1">
<param name="PropertyDialogEnabled" value="1">
<param name="ScrollbarsVisible" value="1">
<param name="ToolbarVisible" value="1">
<param name="SRC" value="http://PATH TO YOUR VISIO FILE">
<param name="CurrentPageIndex" value="0">
<param name="Zoom" value="-1">
</object>
Customise these parameters as you need and click OK. The main points to customise here are the Height, BackColor and PageColor parameters as these will have the most impact on the look and feel of the webpart.
Now when the page refreshes, you should see your floor plan. If you created multiple pages, then these will be shown at the bottom of the diagram. Click one of your printer symbols to see it fire up the script and install the printer.
Note that the Visio viewer allows the user to zoom in and out and pan around the diagram so you get a pretty decent experience here and with SharePoint 2010 on the horizon the user experience will be even better due to the new Visio Services.
Creating custom webpart zones WSS
We’ve had a query appear on the Technet forums where the poster was asking how to create a page in SharePoint with custom webpart zones. After a fair bit of confusion, I thought I’d create this blog post showing how it’s done (it’s much easier to understand when images can be used)
First up, you need to launch SharePoint Designer 2007 and connect it up to your site.
Now click on File | New | Create from Master Page
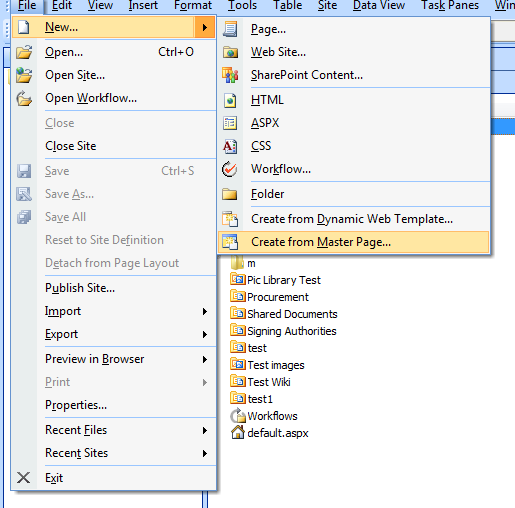
This will then fire up a dialogue box asking for the master page you wish to use. In this test case, I will simply leave it at the default.master:
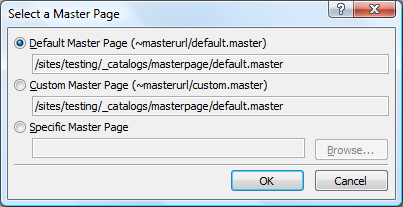
SharePoint Designer will now create a new .aspx page and apply the master page to it. This can take a few seconds (in my test environment anyway). Once it has finished, switch to design mode. We need to look for the PlaceHolderMain region which by default, cannot be modified. If you mouse over the region, you will note that the cursor icon shows that the region is inaccessible. We therefore need to allow this (so we can whack in our webpart zones) and we do this by clicking on the menu attached to the right of the region and clicking on the Create custom Content link:

When you mouse over the PlaceholderMain region, you will now see that we can make some changes. The first thing we will do is to insert a table to hold our webpart zones. Click on Table | Insert Table and configure the table according to your needs:
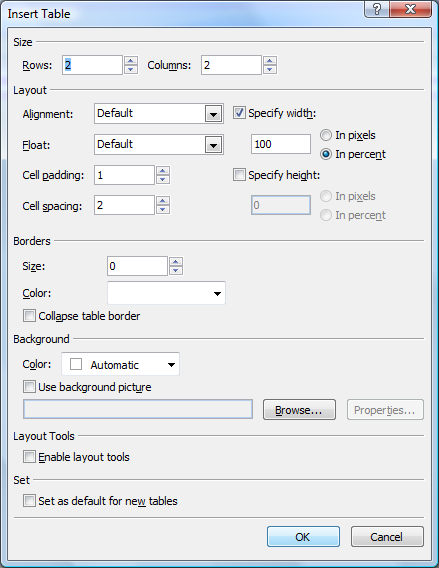
When you are ready, click OK. Now that is done, we can start to add our webpart zones. Click into your first cell and then select Insert | SharePoint Controls | WebPart Zone. Repeat this for each cell in which you wish to hold a zone:
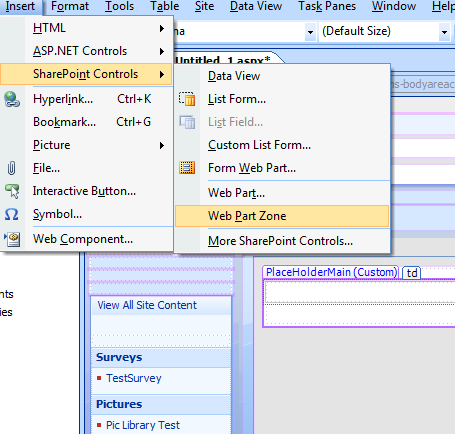
Now we can save our page and see how we’ve got on:
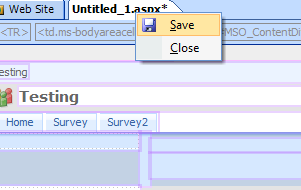
You can now browse to your new page through Internet Explorer and take a look. Don’t forget that you will need to click on Site Actions | Edit Page to see the webpart zones!

Looking good so far. Now you can whack in your webparts and your good to go.
Sandbox Environments – Starting out.
SharePoint can be a hugely intimidating task to undertake and for the newcomer, getting hands on with a machine with which you can play around with is an absolute must for learning the ways and nuances of SharePoint. These Sandboxes are great as they do not impact your live system and if you go horribly wrong, you can simply revert the sandbox back and start again.
Microsoft offer a pre-built virtual image free to download (http://www.microsoft.com/downloads/details.aspx?familyid=67f93dcb-ada8-4db5-a47b-df17e14b2c74&displaylang=en) and this will allow you to try out all the features of MOSS 2007 (for a limited time). However, a drawback with this is that the virtual machine has already been installed and configured. This is great for power users/information workers who want to check out libraries, wikis etc. But what about the admin who will be installing SharePoint? For the admins, we need to go through a full installation within our own Virtual PC.
When I first thought about this blog post a good while back, I planned to walk through an entire installation from installing Windows Server 2003 R2 to installing MOSS and creating the 1st site collection. I started to go through the process, grabbing screenshots along the way when I came to realise that this was going to be way to big to whack up onto a simple blog post or even splitting it up into multiple posts. It was at this time, I came across another site ran by Tony Zink who had gone through the exact same thing as myself.
Tony has set up a series of pages, each with full installation steps with more screenshots than you can shake a stick at! If you are starting out in SharePoint and want to go through a highly detailed installation process, you simply cannot go wrong with following Tony’s guide. http://www.pptspaces.com/sharepointreporterblog/Lists/Posts/Post.aspx?ID=28
In additions to Tony’s step by step guides, I would add in that you should be looking to apply the latest patches to your SharePoint installation – note that the sandbox is useful for testing out patches out as well.
There are plenty of other resources out there to help with installing SharePoint but I would strongly recommend attending the MS5060 and MS5061 courses. These cover off the installation and configuration of both Windows SharePoint Services 3.0 and Microsoft Office SharePoint Server 2007 so whereas Tony’s guide shows you the “how”, these courses will show you the “why” which ultimately is more important.
Feel free to leave any comments if you are stuggling with the initial setup of WSS or MOSS.
SharePoint Best Practises Conference UK
SPBPUK is now kicking off in London and promises to be a fantastic event – shame that I won’t be attending 😦
I plan to keep a close eye on Twitter over the next 3 days and will repost and links to slide decks/info here (and will continue to do so as the days go on so keep checking for updated info).
- SPBPUK programme – http://www.sharepointbestpractices.co.uk/
- First photo courtesy of Joel Oleson (or is it Joey from Friends?) – http://twitpic.com/2vvw9.
- Waiting for slide deck but Joel’s keynote seems to have gone a storm – comparing SharePoint to the Monty Python killer rabbit and melted pastic.
- Spencer Harbar: Authentication Myths – http://twitpic.com/2wqsc
SharePoint Designer – now free
If you haven’t heard by now, Microsoft have confirmed our suspicions that SharePoint Designer 2007 is now available FOC!
http://office.microsoft.com/en-us/sharepointdesigner/FX100487631033.aspx
The twitterverse has been awash with this news which is starting to get tiresome already, I guess thats just one of the drawbacks of Twitter.
Whilst this is good news, it does bring with it the possibility that everyone will download, install and start editing your SharePoint sites! Not so good after all eh.
I’ll update this post later as there are details from Microsoft on how to “batten down the hatches” to stop everyone destroying your SharePoint environment.
Welcome and “How your server name can affect InfoPath”
Welcome to my new blog, hosted on WordPress. This is an entirely new venture for me and I plan to use this blog to discuss all things SharePoint (although I’m not a developer yet, there’s still LOADS to talk about). I am looking to increase my developer knowledge so if anyone has some good resources, please let me know! But for now, we will concentrate on the administrator/power user side.
This is something that I’ve been planning to do for quite some time now but never really knew where/how to start. My thanks go out to Michael Gannotti for giving me the inspiration and knowledge (through his Michael on the Go videos) to get started down the whole blogging path.
So let’s get started shall we?
I thought we’d start off this new blog with a SharePoint issue I came across a while back regarding SharePoint server names and how they can affect InfoPath Forms Services:
I was following Paul Culmsee’s series of articles regarding the humble leave form (see article on SharePointmagazine.net) which I highly recommend as the articles are very in-depth and Paul’s writing style is outstanding. I had my form tarted up and looking good and published it up to my sharepoint sandbox. I fired off the publishing wizard and went through the normal procedure to upload into SharePoint.
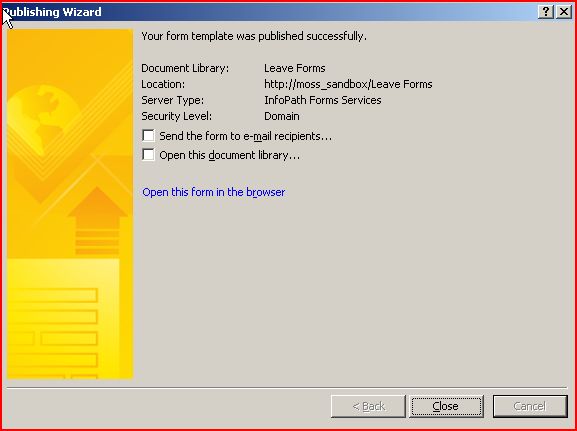
Hey! Success! Eager to see the end result, I fired up my SharePoint site.
Joy of Joys! My new forms library had been created. Clicking on the New Document link, I fully expected to see my new form in all it’s glory – only to be shown:
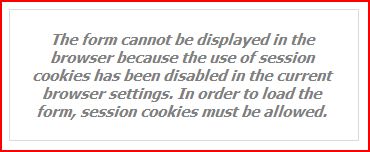
DANG. And it was all going so well 😦
I searched and searched for what felt like an enternity, trying to figure out why this was happening and was getting nowhere. Changing IE advanced privacy settings to always allow session cookies etc had no effect at all. Finally, I came across a small gem that explained there was a little known issue regarding server names and SharePoint. This issue was with the underscore character ” _ “. It had nothing to do with Internet Explorer settings at all.
My server name (see 1st screenshot) was MOSS_SANDBOX and it was this underscore that killed off my infopath forms!
When I first came across this error, I was using MOSS2007 with no patches. I updated to SP1 etc as a test to see if Microsoft had resolved the bug but alas, it still remains.So how do we fix it? Well, we have 3 options.
- Rename the server. If you want to go ahead and rename a SharePoint server (especially a production server), go ahead but personally, I’d have a good long think before I went down this route – think of it as last resort.
- Set up an AAM (Alternate Access Mapping) – My primary choice!
- Don’t use underscores!! – I understand that by this time, it may be too late but put this into your naming conventions so you need never worry about this issue again.
In this instance, I went for option 2 and changed the default Internal URL from http://mosss_sandbox to http://moss (and set up a DNS A record accordingly) and went to test it again – this time using http://moss as the URL. Clicking on New Document, I got this:
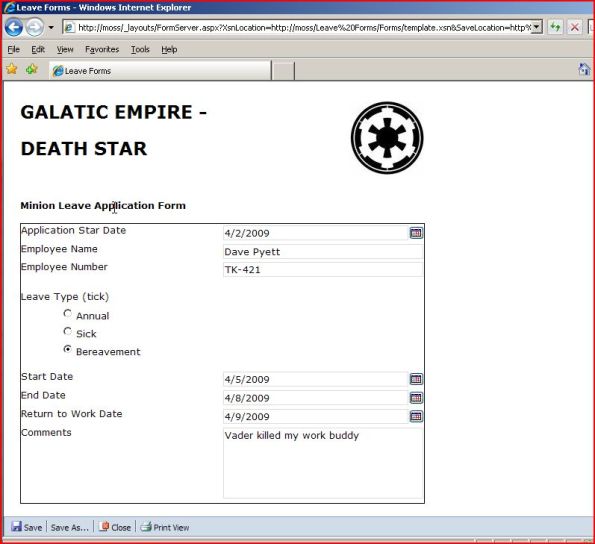
Alright! All sorted and now I can get my leave approved – I need a holiday after figuring out that one thats for sure 🙂
I think that’s enough rambling on for today so I’ll sign off for the moment and get cracking on the next couple of posts.
Don’t forget to follow me on twitter (http://twitter.com/DPyett)


